

The Orange Pi Lite2 is a very interesting small computer board.
- AllWinner H6 CPU (64bit)
- 1GB DDR3 SDRAM
- USB 3.0, USB2.0 and Micro SB OTG port
- Wifi
- Bluetooth
- IR receiver
- Microphone
- NO Ethernet port (!)
In this time (october 2018) the software for this board is a bit limited, most versions are in Beta state.
Armbia, Debian Jessie and Ubuntu are not finished - and features are missing.
Armbia, Debian Jessie and Ubuntu are not finished - and features are missing.
How to setup the Orange Pi Lite2?
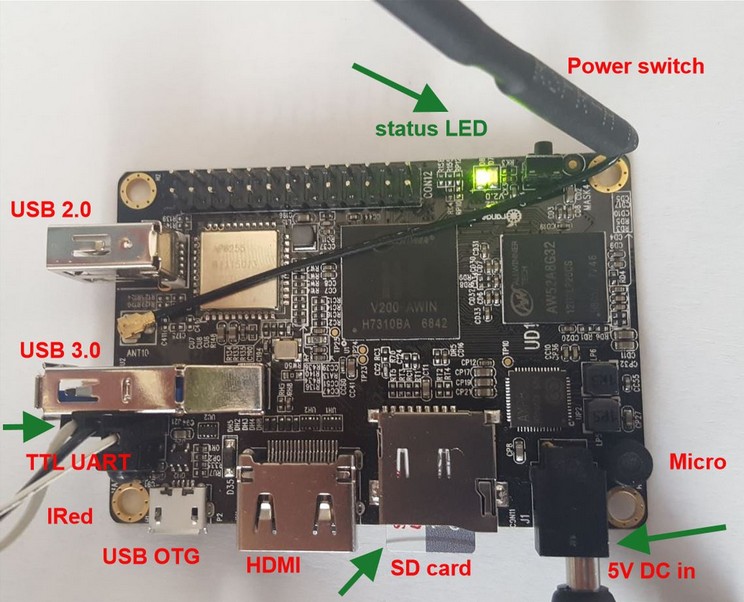
At first - board does NOT support power via Micro-USB ! You should use the power connector - I have taken an USB cable:
USB -> DC 4.0x1.7mm male.
Oryou can use an other 5V/2A power source with same connector.
Download from Orange PI site (or maybe etter form OS vendors site) the latest image for your preferred OS and create a boot disk.
I think I must not explain how to do this.
HDMI output is not supported in this time for Debian and Ubuntu - I didn't realize this at first.
The only way is to use the serial debug output.
Connect a USB-to-Serial adapter to the connections RxD/TxD/GND near the USB3.0 port (see picture on left side TTL UART).
Of course connect board TxD with RxD of Adapter and board RxD with TxD.
Connect with a terminal program (Putty for Windows, picocom/minicom for LINUX) with 115200 baud.
(for picocom as sample: picocom --baud 115200 -r -l /dev/ttyUSB0)
Now connect the power source to the board and check the terminal output:
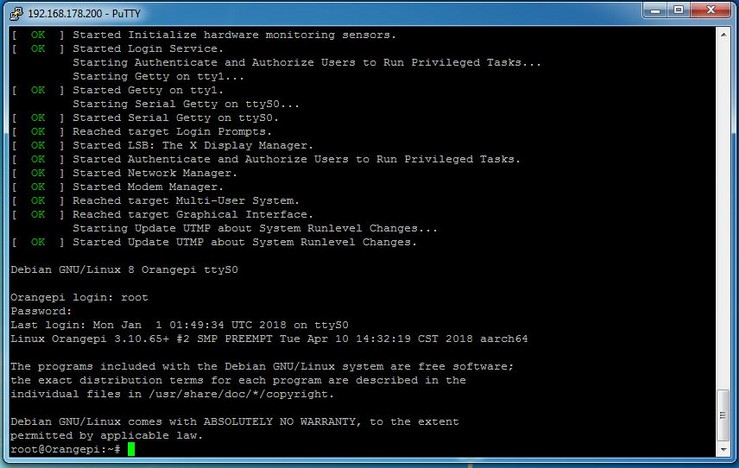
Default root password is in most cases orangepi.
WiFi setup:
Check at first for the name of your wlan interface.
Yes,.. it should be wlan0 - but in some cases (like my) it can be wlan3 or something like this!
Yes,.. it should be wlan0 - but in some cases (like my) it can be wlan3 or something like this!
Use:
ifconfig
Then check for the output - is there wlan0: or something else.
If your router is using wpa2-personal security (it will be in most cases) you can use:
wpa_passphrase "YOUR_SSID" "YOUR_WIRELESS_KEY" > /etc/wpa_supplicant.confThen check the output to be sure that all is ok:root@Orangepi:~# cat /etc/wpa_supplicant.conf
Output looks like:
network={
ssid="YOUR_SSID" #psk="YOUR_WIRELESS_KEY"psk=d456c00dcb9049dde30c75fdbb115dba7fd28749021f01c28d314e80472e0b33
Define the IP for the Orangepi:
root@orangepilite:~# nano /etc/network/interfacesFor a static IP of your Orangepi delete all in this file (or comment it in) and insert:
REPLACE wlan0 with your interface name like wlan3, if needed - see above.auto lo auto wlan0 iface lo inet loopback iface wlan0 inet static address 192.168.77.200 netmask 255.255.255.0 gateway 192.168.77.1 pre-up sudo /sbin/wpa_supplicant -iwlan0 -c/etc/wpa_supplicant.conf -Dnl80211 -B pre-up sleep 5 post-down sudo killall -q wpa_supplicant(Ctrl-X for exit nano with saving before)For a dynamic IP (DHCP) of your Orangepi delete all in this file (or comment it in) and insert:REPLACE wlan0 with your interface name like wlan3, if needed - see above.
auto lo iface lo inet loopback auto wlan0 iface wlan0 inet dhcp wpa-ap-scan 1 pre-up sudo /sbin/wpa_supplicant -iwlan0 -c/etc/wpa_supplicant.conf -Dnl80211 -B pre-up sleep 5 post-down sudo killall -q wpa_supplicantReboot the orangepi with "reboot" - then check your configuration after login with
ifconfigThe wlan0 interface shoud show you a line with inet address like this:
inet addr:192.168.77.200Bcast:192.168.77.255Mask:255.255.255.0inet6 addr: fe80::cccc:aaaa:feee:6002/64 Scope:Linkinet6 addr: 2003:cc:e777:400:ceee:aaff:feee:6002/64 Scope:Globaldisable ipV6 - if needed:change: /etc/sysctl.confnet.ipv6.conf.all.disable_ipv6 = 1net.ipv6.conf.default.disable_ipv6 = 1net.ipv6.conf.lo.disable_ipv6 = 1service sshd restart